https://s3.amazonaws.com/lumberjocks.com/n4uzqv9.jpg

This is another project that I’ve been kicking around for awhile now. Kind of time consuming but think it will be a good one for the long run:
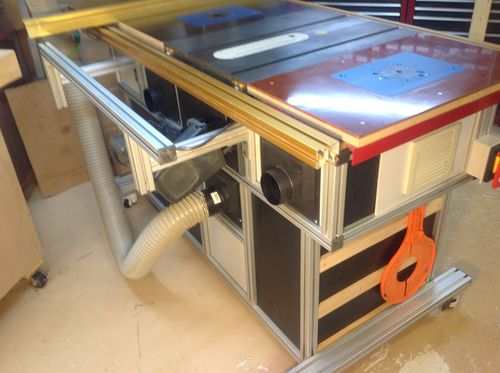
First off, this is an older Craftsman “113” contractor saw. I would much rather have a shiny new cabinet saw, but lack of power and funds are preventing that! Some of the mods were done earlier and here was the saw prior to this last round of changes. I’ve never cared for those sheet metal bases on those saws. Really hard to add storage, etc. Also, the router table on the left which is solid Maple, has too much movement in it and had to go:

Most of the materials used are re-purposed, such as the 80/20 style aluminum channel (obtained used for free) along with all the gray and black plastic panels. The drawer slides were a garage sale find. Nearly all the hardwood used is old Maple gym floor I got cheap.
I did have to buy the casters, dust ports and 2 switches (they are about $10 on Amazon) made by Woodstock.
The frame design was largely dictated by the used material I had on hand, and tried to design with a minimum amount of cutting aluminum. It’s noisy and messy..
FRAME:


The casters are the industrial ones that have the rubber pads that can be used to level the rig:

STORAGE:
There are 8 drawers and one open compartment. 4 of the drawers have Kaizen foam in them:

One deep drawer in the middle holds the saw blades (there is a blog on that HERE) and a tenon jig:


Three wide drawers hold 2 miter gauges, 2 crosscut sleds and a miter sled:


THE SAW:
I covered the front of the saw with some rubber sheet material I had laying around. Not that pretty, but it covers up some of those gaping holes. I removed the factory tilt indicator thing because it’s virtually useless and requires a much bigger opening to function. The tilt scale is there mostly as a novelty. I also printed out the serial and model number of the saw (just in case) because the original plate is covered up now:

In the back of the saw, I built 2 removable panels to enclose the back and use rare earth magnets to keep them on the saw. Unfortunately, they have to be removed to tilt the blade. I may build a 45 degree tilt version some day, we’ll see:


I built an extra beam on the out-feed side of the saw to place 2 movable out-feed boards on. The challenges in designing out-feed for this rig is the Incra TS-LS fence rides on top of the back rail so you can’t have a permanent structure on top of the rail. The other issue is the tilting motor in the back, when fully tilted comes very close to the plane of the saw table. So the rail I added is just behind the motor allowing it to tilt.
The sliding out-feed boards have plastic runners that keep them in place, but can be moved or removed quickly:


Also, my downdraft table (which I had to install a lift kit on for this build!) falls just below the out-feed boards:

ROUTER TABLES:
There is a router box on both sides of the saw. You can access the routers under the table with removable panels that are held in place with rare earth magnets. Also, both boxes are hard wired with a duplex outlet inside each box:
This is the right box (which is also the access to tilt the saw):


And the left box which has access from the end of the frame:


The table on this box is mounted directly to the aluminum frame and not the saw. All I can say is it is REALLY sturdy…
DUST COLLECTION:
There are three 4” dust ports on the back on the cabinet and I have to change the quick connect hose for each:

The dust box for the saw has an angled bottom and works good. Haven’t tested the router boxes yet, but I’m guessing they will be marginal, but better than no dust collection:

The blast gate is mounted near the ceiling and at the back of the saw, which is un-reachable from the front of the saw. I attached a dowel to the blast gate so you can open and close the gate from the front. Also marked a line on the dowel so you can tell if the gate is open from across the shop, because the gate itself is hidden behind the ceiling mounted air cleaner:


OTHER STUFF:
The saw is wired separately from the 2 router tables and these 2 cords are zip-tied above the right side of the saw. This makes it really convenient to unplug things for safety reasons and also means you can’t have the both the saw and router tables plugged in at the same time….also for safety reasons. I’ve been known to hit the wrong switch before. Also, there is a little flashlight mounted there which makes reading the Incra scale much easier:


I still intend to build several zero clearance inserts for the saw and will install splitters in them. I purchased the Leecraft (CR-1) to use as pattern. This is a really nice insert and completely adjustable for height and fit:


Lastly, for those of you that have the Incra fence, you know that it is a space hog when the fence is opened wide. I found a spot is the shop where the fence can be open and doesn’t affect any other stuff, basically it opens into an un-usable space between the dust collector and the separator:

Like everything else in the shop, I’m sure there are more changes coming…….
Thanks for lookin’
Source: LumberJocks.com
The Basement #41: Moddin' the Table Saw.....
No comments:
Post a Comment